Many components have attributes, which are properties for configuring how the component behaves or appears. The attribute table is for viewing and displaying a component's attribute values.
To select which component's attributes you wish to view, click
the component using the Select tool
(![]() ).
(You can also right-click (or control-click) the component
and choose Show Attributes from the popup menu. Also,
manipulating a component via the Poke tool
(
).
(You can also right-click (or control-click) the component
and choose Show Attributes from the popup menu. Also,
manipulating a component via the Poke tool
(![]() ) or the Text tool
(
) or the Text tool
(![]() ) will display that component's
attributes.)
) will display that component's
attributes.)
The below screen shot demonstrates what things look like after selecting the upper input of our XOR circuit and scrolling down to view the Label Font attribute.
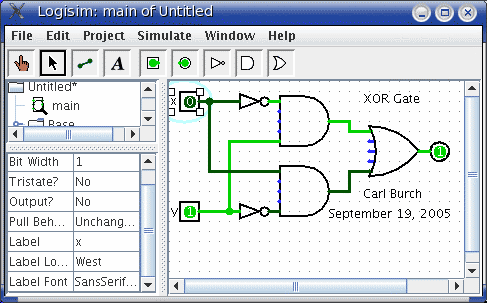
To modify an attribute value, click on the value. The interface for modifying the attribute will depend on which attribute you are changing; in the case of the Label Font attribute, a dialog box will appear for selecting the new font; but some attributes (like Label) will allow you to edit the value as a text field, while others (like Label Location) will display a drop-down menu from which to select the value.
Each component type has a different set of attributes; to learn what they mean, go to the relevant documentation in the Library Reference.Some components have attribute values that cannot be changed. One example of this is the AND gate's Gate Size attribute: As soon as you create an AND gate, is size is fixed. If you want an AND gate of a different size, then you'll need to change the attributes for the tool, which we'll discuss next.
Next: Tool attributes.